Showing posts with label Blogger Gadgets And Widget. Show all posts

How To Add Animated Mouse Cursor Into The Blogger Blog

How to change mouse cursor in blogger blog to animated cursors

How to change mouse cursor in blogger blog to animated cursors.One of the best way to add extra fun to your blog is, changing mouse cursor on your blog. Changing the mouse cursor in blogger or blogspot blogs is very easy.This tutorial will help you to change the mouse cursor of your blog to animated cursors.Many bloggers are asking such kind of questions but there is no tutorial available on the internet.I created this post because there are a blogger friend who asked how to change the pointer / cursor on the blogger. This you can do to decorate the look of blog.


I take the cursor image from http://www.cursors-4u.com and http://rw-designer.com you can change it anytime depends on your festive moods.


How to Install mouse cursor in blogger blog to animated cursors


How to add HTML-CSS-Javascript Codes to your Blog ? 

This is very simple and easy you only follow below steps and add this widget in your blog.

Step 1 Log-in to your Blogger account.

Step 2 Backup your Template.

Edit Template HTML


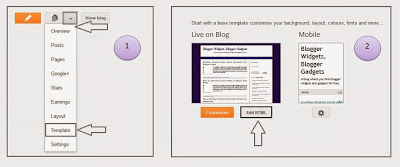
Step 3 Click on The Template>> Edit HTML>> Proceed.

Step 4 Now find [by pressing Ctrl + F ] this code in the template:

</head>

And immediately Before it, paste this code:


<link href="http://dl.dropboxusercontent.com/s/sjqjsg1hc0rodn5/24work.blogspot.com-1.css" rel="stylesheet" type="text/css" /><a href="
http://toptech4u.blogspot.com/" target="_blank" title="Blogger Templates"><img src="https://bitly.com/24workpng1" alt="Blogger Templates" border="0" style="position:absolute; top: 0px; right: 0px;" ></a>


And now click Save Template 


Change Mouse Cursor Generator by 24work.blogspot.com

How To Add Mouse Cursor Widget To Blogger?

  • Choose a type of Mouse Cursor below
  • Click on "Genetate" button
  • Finally click on "Add to Blogger" to add it to your blog.


Note:  We are going to add more cursor, cursor pointer, cursors, mouse cursor, Totally Free Cursors, Myspace Cursors, Animated Cursors and cursors oftenly so keep visiting this page.


Blogger MySpace Cursor Code Generate 


You can change the appearance of the cursor on the MySpace profile page (the cursor is the little that moves on the screen by moving the mouse). For example, you could make the appearance of the cursor as a question mark when the user hovers over an object.The widget is originally developed by code-generator.net, i just changed something in the widget.


How to Install Blogger MySpace Cursor Code Generator Widget

Now let's start adding it... 

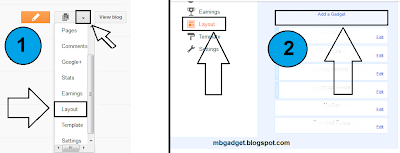
Step 1. Login to Your Blogger Account.Go to your Blogger Dashboard.Click on Layout tab from left pane and click on Add a Gadget link. 


Blogger Tips And Tricks|Latest Tips For Bloggers

Step 2. After click on Add a Gadget link A pop-up box will open now
with many gadget list, Choose HTML/JavaScript from the gadget options by clicking the blue plus sign for that gadget. 


Blogger Tips And Tricks|Latest Tips For Bloggers

Step 3. Select 'HTML/Javascript' and add the one of code given below. 

Step 4. Now Click On Save 'JavaScript' You are done.

How To Add New Digital Animated Flash Clock To Blogger Blog - 2014 Widget For Blogger

Flash Clock Widget For Blogger 2014

How To Add New Digital Animated Flash Clock To Blogger Blog

Here's the cool Clock.this tutorial will show you how to Add animated flash clock gadget your Blogger blog. A clock gives a beautiful look to a website. A clock is a necessity for a personal website, forum, blog etc.Isn’t it exciting when you get a highly quality flash Clock absolutely Free? you can add this flash animated clock your blog easily.i've tested this Flash Clock on internet explorer, mozzilla firefox & many other web browsers. it's very fast and fresh.You simply have to copy the code below each clock and add it to your blog.


How To Add Aniamted Flash Clock Widget To Blogger?

  • Choose a type of clock below
  • Provide Require widget title
  • Fill Height and Width of the Widget
  • Click on "Genetate" button
  • Finally click on "Add to Blogger" to add it to your blog.
Add Animated Flash Clock To Your Blogger blog


Now let's start adding it... 

Step 1. Login to Your Blogger Account.Go to your Blogger Dashboard.Click on Layout tab from left pane and click on Add a Gadget link. 

Blogger Tips And Tricks|Latest Tips For Bloggers
How To Add New Digital Animated Flash Clock To Blogger Blog

Step 2. After click on Add a Gadget link A pop-up box will open now
with many gadget list, Choose HTML/JavaScript from the gadget options by clicking the blue plus sign for that gadget. 

Blogger Tips And Tricks|Latest Tips For Bloggers
How To Add New Digital Animated Flash Clock To Blogger Blog


Step 3. Select 'HTML/Javascript' and add the one of code given below. 

Step 4. Now Click On Save 'JavaScript' You are done.

How To Add RSS Feed Subscribe Social Widget For Blogger Website - Blogger Widget 2014

RSS Feed Subscribe Social Widget For Blogger Website

You know that sharing a beautiful and informative widget is my passion here is new rss feed subscribe widget for blogger website, it increase the visitors to your site and it also enhance the user experience to connect with the site, If you want to make a site like professional then it’s easy to do. Simple you have to add a gadget to your site or blog which can make you site able to connect with their readers.

This Gadget Looks Like This


  • Now simple Go to Your blogger dashboard
  • Click on Layout of your blogger 
  • Click on Add a widget on the section of blogger when new page loads


  • And One more step


  • A new window appear and click on HTML/Javascript by scrolling down
  • Add this code in the HTML/Java Box.

{


<style>#topbox{width:250px;border:1px solid #a1a1a1;background-color:#ffffff;padding-bottom:15px;padding-top:5px;padding-left:5px;}  #news-letter{clear:both;padding-top:20px;} .msg-box{float:left;width:50px;height:54px;margin-right:9px;padding-top:5px;background: url(https://blogger.googleusercontent.com/img/b/R29vZ2xl/AVvXsEjWVXC3qVnrt0wcd1H8hra6-00WJKRanhHDngFoB40G0eWlANbDDJ09ITKxeuf-it2wGjOg6psW8oAg87JS8gBhZVi7na7jxJGuRIwo26IfspqFH1cCtaGLt7oj9RNiHDXCfe-P1b_bIXU/s800/mail-box.png) no-repeat;} .news-headline{position: relative;z-index: 999;font-size: 18px;padding-bottom:10px;font-weight:bold;} </style><br /><div id="topbox">
<center>
<div class="news-headline" color:="color:">
Get Free Email Updates </div>
</center>
<center>
<table border="0"><tbody>
<tr><td style="padding-right: 4px;"><a href="http://twitter.com/mbgadget" target="_blank" title="Follow Me On Twitter"><img src="http://www.techblis.org/wp-content/uploads/2013/08/twitter.png" style="height: 25px; width: 25px;" /></a></td><td style="padding-right: 4px;"><a href="http://feeds.feedburner.com/mbgadget" target="_blank" title="Subscribe Via RSS"><img src="http://www.techblis.org/wp-content/uploads/2013/08/feed.png" style="height: 25px; width: 25px;" /></a></td><td style="padding-right: 4px;"><a href="http://www.facebook.com/mbgadget" target="_blank" title="Find Us On Facebook"><img src="http://www.techblis.org/wp-content/uploads/2013/08/feacebook.png" style="height: 25px; width: 25px;" /></a></td><td style="padding-right: 4px;"><a href="https://plus.google.com/103972539975877843225" target="_blank" title="Add me on Google+"><img src="http://www.techblis.org/wp-content/uploads/2013/08/gplus.png" style="height: 25px; width: 25px;" /></a></td><td style="padding-right: 4px;"><a href="http://youtube.com/username" target="_blank" title="Add To Technorati"><img src="http://www.techblis.org/wp-content/uploads/2013/08/feed-2.png" style="height: 25px; width: 25px;" /></a></td></tr>
</tbody></table>
</center>
<a href="default.asp"><img src="https://blogger.googleusercontent.com/img/b/R29vZ2xl/AVvXsEhr1IUth_r7uvaSs4j_Pt3ed-Fqa3e-r1fjWa4_PisKgDfMUXmFzIkauQ4GGpdbMDjEX2fyAs3XseiEDYVoifp9ImasgvunYJLgBsn_hrRGfaDAr64vLRAUht7zLypV92PZIN1yqCORZMpn/s640/white-square-872x844.jpg" alt="rss subscribe widget for blogger" width="1" height="1" /></a><div id="news-letter">
<span class="msg-box"></span><b>Sign up for newsletter</b><br /><form action="http://feedburner.google.com/fb/a/mailverify" method="post" onsubmit="window.open('http://feedburner.google.com/fb/a/mailverify?uri=mbgadget', 'popupwindow', 'scrollbars=yes,width=550,height=520');return true" target="popupwindow">
<input class="ebutton3" gtbfieldid="2" maxlength="100" name="email" onfocus="this.value = '';" size="25" style="color: #333333; font-size: 11px; height: 21px; width: 130px;" type="text" valign="middle" value="Enter your email address" /><input name="uri" type="hidden" value="bloggertrix" /><input name="loc" type="hidden" value="en_US" /><input class="ebutton2" id="submit" style="font-size: 11px;" type="submit" value="Send" /></form>
</div>
</div>
<div class="clear">
</div>
<br /><div class="clear">
</div>
 

}

And You Are Done!

Why use RSS gadget:


You really know the importance of a visitor to your site, and a person’s will is always stayed on it that he need more and more readers of their website, so it will be a huge website over all internet, to make this happen you have to provide the all platforms that people can easily connect with easily. Suppose that a person have email address and want to get updates from your site or blog whenever a new post added then you have to add the RSS subscription widget to blog or site, it will increase the professionalism in the site.

Effect on your readers:


Well you know that website is the main source of information and if you provide it in such a ways that people can easily handle and read it then it’s very powerful you can easily control and fulfill the desire of readers. You know when you site got maximum views it bring fully powerful result into the site performance, you site get more power and you can enhance your business in this way.

Performance:


You know that Google is now more powerful and it require some social points to your website or its internal post, so simple if you want to get some search engine traffic or some real and final ready to buy customers to your site or blog then you need to add the social gadgets.

How To Install Instagram Widget For Blogger Blogs - Blogger Widgets 2014

How To Install Instagram Widget For Blogger Blogs

Here i am going to share you that how to install the instagram widget to blogger blog, its very simple and you don't need any professional skills to install it on your blogs, Yon know that if you are register on Instagram website and you want to show its photos on your blog, then you have to add little code to your blog, Here it that what to do, Simple
  • Go to Instagme.com
  • Paste the Username in front of user section
  • Insert #tag (its like keyword, and it display the #tag related photos from your section)
  • You can also edit, boarder size, widget type and background color
  • And finally you got the code for it
  • Here is the image that shows you how to do that

  • You have to fill all these information
  • You can also see the preview of your slideshow that how it looks like
  • Just click on Preview button if you want to see the preview
  • If you are final and want to add the widget then click on Get Code Button
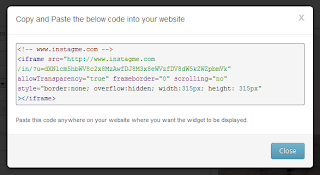
  • And the following simple message appears .
  • Copy the code and paste it your blogger >> Layout >> Add a Widget >> HTML/Javascript
  • Its very simple here the screenshot what you have to do in blogger.


And your widget is finally installed, Now enjoy and refresh your blogger homepage and the images like slideshow are displaying on your penal where you add the gadget.
 
You know that its not very difficult to do so, So if there is any problem let ask me and i will find it with my way.

Why we add widget:

You know that someone who has a special widget to there sites and have some good wallpapers to sell then this is good way that you can also sell the photos if some people like it, If you add a little link to buy these photo along with your slideshow may some one interested in your pictures and buy it from the link.

So this is very good way to increase your sales of photos that you created, but some users just add these photos for popularity so they god some visitors to there photos and they become little famous over there.

How To Add A Custom Domain To Blogger Blog - Blogger Gadgets 2014

How To Add Custom Domain Name To Blogger Blog

How To Add A Custom Domain To Blogger Blog - Blogger Gadgets 2014
I am showing you the powerful and easy method to install the custom domain to your blogger blog with some simple steps. Do you know why we need custom domain for blogger blog without using .BlogSpot.com ?


I am going to tell you why we should use custom domain on blogger to get more powerful results and for professional point of view.

Using your own domain name increase the visitors to your website and your site looks professional.
  • You can enhance the audience and your working style.
  • Its very frustrating if you have .blogspot.com domain, because its considered like normal sub-domain blog.
  • Its easy to add your domain name to your blogger blog. (Previously mbgadget is not a blogspot free domain but now i moved it to working mbgadget.com doamin). 
  • If you use your own professional .com, .net domain or any other brand name then its more secure and powerful then normal.
Here are some major work that you have to do when adding your own domain name to blogspot blogs, Remember  you have to do that professionally.

You have to do these steps for adding your domain on blogger.

  • Go to blogger dashboard
  • Select your blog that you want to add a custom domain
  • Go to setting while clicking on the down arrow button display along with blogger.
  • Now in a Basic setting under publishing section you can see the link to +add a custom domain click on it now.


  1. Now you have to insert the domain name into the field which display after clicking on add a custom domain link.
  2. Be sure that you added www before adding the domain. (Here in blogger you can't use naked domain as main, if your hosting account allows this then it may possible).
  3. Download the setting file and read instruction link how to setup the DNS to your domain. (I explain it here). Read some setting of domain here
  4. Copy all CNAME setting that displayed on your page (like image below) to text document and it will use in domain settings. here are some cname setting about it

Now you just have to install the DNS setting on your domain manager and its very easy to do here is the step 3 which is installing the DNS or CNAME setting to your domain manager.


  • Go to your domain controller where you buy the domain, like godaddy, namecheap, or name.com or any site where you buy your domain.
  • Just look up at domain dns setting you have to set it that you copied in a text file previously.
  • Set the DNS to ghs.google.com
  • Complete the Label, Name, Host field section in your domain account and Set the Cname exactly your blogger account provides you.
  • Now wait a little time and add the domain like the above picture shows.
  • Remember you have to add DNS before adding your domain name to blogger if you do this before the dns setup you got error that "blogger cannot able to verify your domain"


After adding all of that you can enhance your blogger style with widgets explore more about widgets just go to homepage and see the powerful widgets which change the looks of your blog amazingly. 

If there is any problem just let ask here and i try to solve it. 

How To Add A Related Posts Widget In Blogger With Thumbnails - Blogger Gadgets 2014

Adding A Related Posts Widget To Blogger With Thumbnail

How To Add A Related Posts Widget In Blogger With Thumbnails - Blogger Gadgets 2014
Here is one more tip to show related post widget for blogger, It is very important to add the gadget because it will increase the visitors on your site without spending to much time on Seo, if you go to the depth then you will easily find that related post widget or gadget comes at the main source of SEO level. So if you really interested to and want to display the related posts in which the posts are open you just have to edit some steps that i tell you here,

There are also many other related post widget over there but this one is also contain the thumbnail so you can also see the thumbnail if the post has image added. (See Category Widget Blogger)

So here is what you have to do, it is very simple


  • Go to blogger dashboard
  • Click on the Template section of the blogger that you want to add widget
  • Now a new page appear and click on Edit HTML Button
  • And next you have to find the code

Find this code in template </head>  After this

  • Now paste this code on above </head> tag
{

<b:if cond='data:blog.pageType == "item"'><style type='text/css'>#related-posts { float:center; text-transform:none; height:100%; min-height:100%; padding-top:5px; padding-left:5px; }  #related-posts h2{ font-size: 18px; letter-spacing: 2px; font-weight: bold; text-transform: none; color: #5D5D5D; font-family: Arial Narrow; margin-bottom: 0.75em; margin-top: 0em; padding-top: 0em; } #related-posts a{ border-right: 1px dotted #DDDDDD; color:#5D5D5D; } #related-posts a:hover{ color:black; background-color:#EDEDEF; } </style><script type='text/javascript'>var defaultnoimage="https://blogger.googleusercontent.com/img/b/R29vZ2xl/AVvXsEgX5FalRKCKHooZT28ZDO5zZdBiCHHpikVBPPfKYTpbq_W3N8L5q8W6FoDdRN-k9yKdbq7nIsFBTEpvaHmVM_bNrQbVn18VQvUsZ9JujZA2_0Fs-i30foaxPhdLL9e3Q1l2YWQLfAwoUb2D/s1600/no_image.jpg"; var maxresults=5; var splittercolor="#DDDDDD"; var relatedpoststitle="Related Posts"; </script><script src='http://helplogger.googlecode.com/svn/trunk/related-posts-with-big-thumbnails.js' type='text/javascript'/><!-- remove --></b:if>

}
Now find this code in template <div class='post-footer'> After this

Paste this code above of <div class='post-footer'> code

{

<b:if cond='data:blog.pageType == "item"'><div id='related-posts'>
<b:loop values='data:post.labels' var='label'><b:if cond='data:label.isLast != "true"'></b:if><script expr:src='"/feeds/posts/default/-/" + data:label.name + "?alt=json-in-script&callback=related_results_labels_thumbs&max-results=6"' type='text/javascript'/></b:loop><script type='text/javascript'>removeRelatedDuplicates_thumbs(); printRelatedLabels_thumbs("<data:post.url/>"); </script></div>
<div style='clear:both'/>
<!-- remove --></b:if><b:if cond='data:blog.url == data:blog.homepageUrl'><b:if cond='data:post.isFirstPost'><a href='http://mbgadget.blogspot.com/2013/08/blogger-related-post.html'><img alt='Blogger related post widget' src='http://3.bp.blogspot.com/-K65p5zLLKQk/T3ObCINoP7I/AAAAAAAABmI/dF84-alnOu4/s1600/best+blogger+tips.png'/></a></b:if></b:if>

}

Now you are done and your gadget is installed successfully.

You have to refresh your blog to see the changes, and i am fully concentrate the code and its works, i also tried it on many other blogs before adding it here.  Edited code from help Blogger

Why use this widget:                                                                                                 

You know there are many options that why we use this gadget to blogger blog. Actually if you are going to build the most page views of your blog then you have to add this gadget and ofcourse it will create much much positive response to your traffic and your page views increase many times more then normal. See how to blogger related posts

If a reader reads the whole article then he/she is also interested to read your other articles so it is not just a gadget it also increase the website performance.

How To Install Favicon To Blogger Blog - Blogger Gadgets 2014

How To Install The Favicon To Blogger Blog


Here the complete and easy method to install the favicon to the website which use blogger. You can add favicon to the blog in many ways like going to Blogger Html Section >> then editing the Blogger Theme to add the favicon, but here i am gonna share you the easy way to install the icon to your blog just as clicking no code need to put.

Now what you have to do just follow these simple steps.


  • Open your blogger blog dashboard.
  • Click the Drop-Down arrow and go to the layout of your blogger blog.
  • Now in upper left corner o layout you can see favicon button click on edit button.
  • The new box appear and click on the brows button to insert the favicon to website.
  • Now click on save.
  • And next the box will close.
  • You must restart the browser to see the effect, if you still now seeing favicon the you must clear the firefox, google chrome or internet explorer history to see the changes you made.
  • Here the screen shop ever step.


Adding favicon with simple way.
  • Now you have to remember these things while adding favicon
  • Favicon site is not greater then 100kb
  • And your favicon sized should be square in pixel like 16x16 or 32x32
           (If the setting is not the same as i said then it may cause the problem in installing the icon)


Now simple save your setting and you are done. You must restart your browser to works fine, may be there is problem in viewing the icon, you must clear the browser history.

If there is any problem let ask in comment i am here to help you out.

Explore the main website where you find some better widgets and gadgets for your website which running on blogger blog.